Docker
Install Docker and Compose
# Add Docker's official GPG key:
sudo apt-get update
sudo apt-get install ca-certificates curl
sudo install -m 0755 -d /etc/apt/keyrings
sudo curl -fsSL https://download.docker.com/linux/ubuntu/gpg -o /etc/apt/keyrings/docker.asc
sudo chmod a+r /etc/apt/keyrings/docker.asc
# Add the repository to Apt sources:
echo \
  "deb [arch=$(dpkg --print-architecture) signed-by=/etc/apt/keyrings/docker.asc] https://download.docker.com/linux/ubuntu \
  $(. /etc/os-release && echo "$VERSION_CODENAME") stable" | \
  sudo tee /etc/apt/sources.list.d/docker.list > /dev/null
# install docker engine
sudo apt update
sudo apt-get install docker-ce docker-ce-cli containerd.io docker-buildx-plugin docker-compose-plugin
Terminology
- Containers Created from Docker images and run the actual application. We create a container using
docker run. A list of running containers can be seen using thedocker pscommand. - Images The blueprints of our application which form the basis of containers.
- Docker Daemon The background service running on the host that manages building, running and distributing Docker containers. The daemon is the process that runs in the operating system which clients talk to.
- Docker Client The command line tool that allows the user to interact with the daemon. More generally, there can be other forms of clients too - such as docker-desktop which provide a GUI to the users.
- Docker Hub A registry of Docker images. You can think of the registry as a directory of all available Docker images. If required, one can host their own Docker registries and can use them for pulling images.
- The
TAGrefers to a particular snapshot of the image and theIMAGE IDis the corresponding unique identifier for that image.
Docker Image
An important distinction to be aware of when it comes to images is the difference between base and child images.
- Base images are images that have no parent image, usually images with an OS like ubuntu, busybox or debian.
- Child images are images that build on base images and add additional functionality.
Then there are official and user images, which can be both base and child images.
- Official images are images that are officially maintained and supported by the folks at Docker. These are typically one word long. In the list of images above, the
python,ubuntu,busyboxandhello-worldimages are official images. - User images are images created and shared by users like you and me. They build on base images and add additional functionality. Typically, these are formatted as
user/image-name.
Image Layers
container images are composed of layers. And each of these layers, once created, are immutable.
 Each layer in an image contains a set of file system changes - additions, deletions, or modifications.
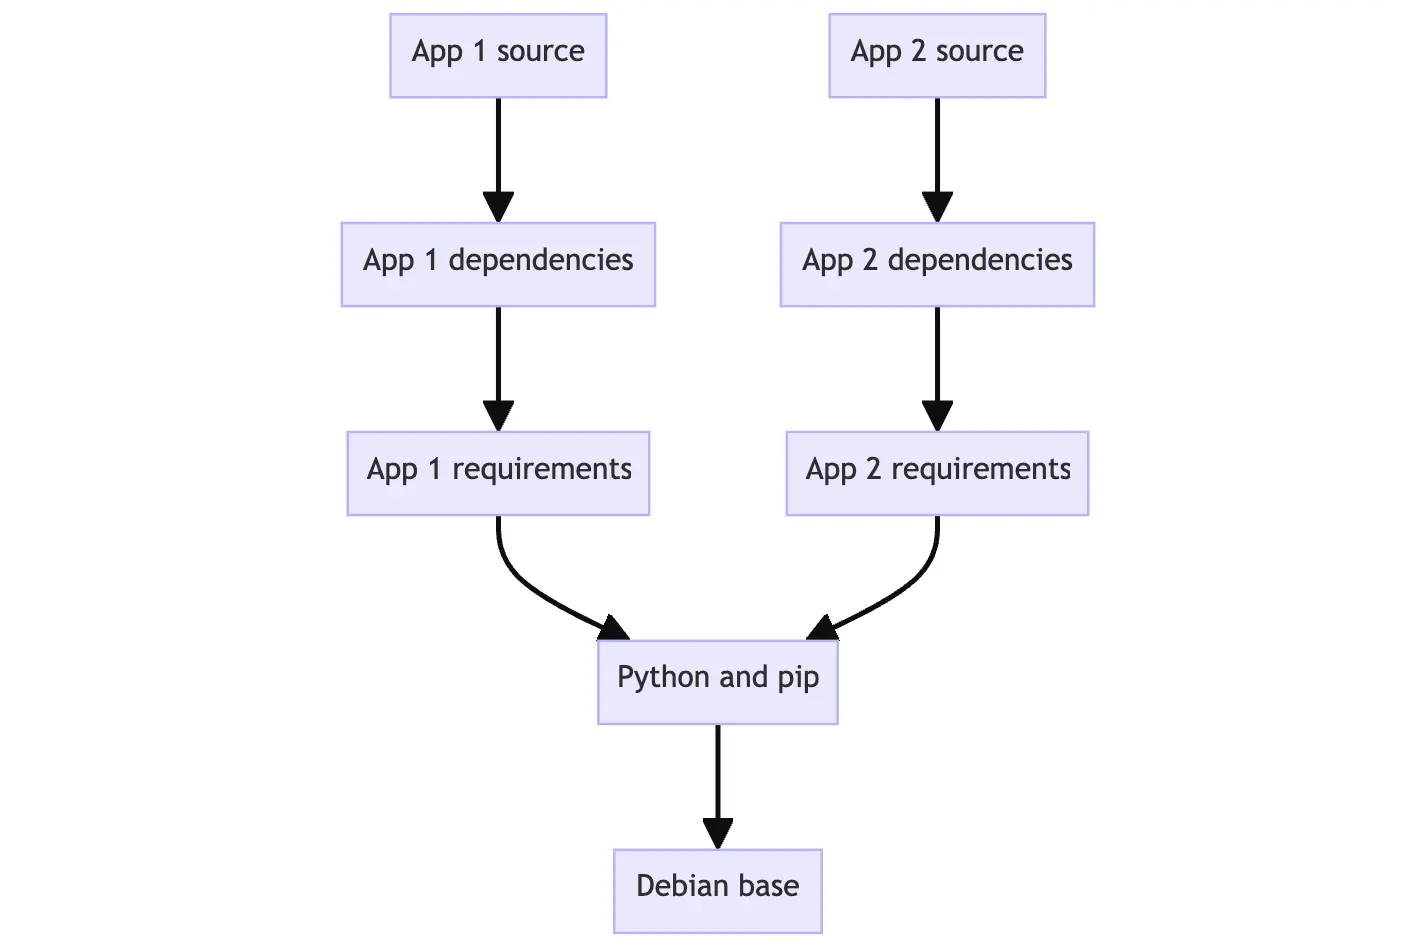 This is beneficial because it allows layers to be reused between images. Layers let you extend images of others by reusing their base layers, allowing you to add only the data that your application needs.
The new layer is able to be stacked by Dockerfile or docker container commit -m <container> <image> manually. And docker image history <image> offers image layers info.1
IMAGE CREATED CREATED BY SIZE COMMENT
c1502e2ec875 About a minute ago /bin/bash 33B Add app
5310da79c50a 4 minutes ago /bin/bash 126MB Add node
2b7cc08dcdbb 5 weeks ago /bin/sh -c #(nop) CMD ["/bin/bash"] 0B
<missing> 5 weeks ago /bin/sh -c #(nop) ADD file:07cdbabf782942af0⦠69.2MB
<missing> 5 weeks ago /bin/sh -c #(nop) LABEL org.opencontainers.⦠0B
<missing> 5 weeks ago /bin/sh -c #(nop) LABEL org.opencontainers.⦠0B
<missing> 5 weeks ago /bin/sh -c #(nop) ARG LAUNCHPAD_BUILD_ARCH 0B
<missing> 5 weeks ago /bin/sh -c #(nop) ARG RELEASE 0B
Dockerfile
A Dockerfile is a simple text file that contains a list of commands that the Docker client calls while creating an \(child\) image.
FROM <image> - this specifies the base image that the build will extend.
WORKDIR <path> - this instruction specifies the "working directory" or the path in the image where files will be copied and commands will be executed.
COPY <host-path> <image-path> - this instruction tells the builder to copy files from the host and put them into the container image.
ENV <name> <value> - this instruction sets an environment variable that a running container will use.
# Ensure virtual environment binaries are in PATH: https://docs.astral.sh/uv/guides/integration/docker/#using-the-environment
ENV PATH="/app/.venv/bin:$PATH"
Shell and exec form
The RUN, CMD, and ENTRYPOINT instructions all have two possible forms:
INSTRUCTION ["executable","param1","param2"](exec form)INSTRUCTION command param1 param2(shell form)
Note
- The exec form makes it possible to avoid shell string munging, because it is parsed as a JSON array.
- The shell form always use a command shell and is parsed as a regular string, so it's more relaxed and inherits shell feature directly.
for example, $HOME can not be parsed as string "$HOME" but replaced by shell.
on the contrary, we need to specify a command shell, or any other executable while using environment variables
Tip
- The Exec form is best used to specify
ENTRYPOINTandCMDinstructions for settings of default arguments that can be overridden at runtime.And it also stops container quicker while runningdocker compose stop. - The Shell form is most commonly used in
RUNcommand, it lets you easier break long command in multiple lines with backslash
RUN [OPTIONS] <command> - this instruction tells the builder to run the specified command.
and creates a new layer on top of current layer. The available [OPTIONS] is helpful for accelerating the building process.
# Install dependencies
# Ref: https://docs.astral.sh/uv/guides/integration/docker/#intermediate-layers
RUN --mount=type=cache,target=/root/.cache/uv \
--mount=type=bind,source=uv.lock,target=uv.lock \
--mount=type=bind,source=pyproject.toml,target=pyproject.toml \
uv sync --frozen --no-install-project
ENTRYPOINT ["executable", "param1", "param2"] - it allows you to configure a container that run as executable. command line arguments to docker run <image> will be appended after all elements in an exec form of ENTRYPONIT, and will override all elements specified using CMD, so will the commands in compose.yml.
CMD instruction sets the command to be executed when running a container from an image.
- CMD ["executable","param1","param2"] (exec form)
- CMD ["param1","param2"] (exec form, as default parameters to ENTRYPOINT)
Tip
we primarily use CMD. Because it's much clearer for us to override it while debugging. Nobody wanna see something ugly like:
services:
  backend:
      restart: "no"
      ports:
        - "8000:8000"
      build:
        context: ./backend
      command:
        - run
        - --reload
        - "app/main.py"
command, quite scary.
Docker Build
This username should be the same one you created when you registered on Docker hub.
it takes an optional tag name with -t and a location of the directory containing the Dockerfile.
copy
.gitignoreto.dockerignoreto slim the/app
Cache
Using the build cache
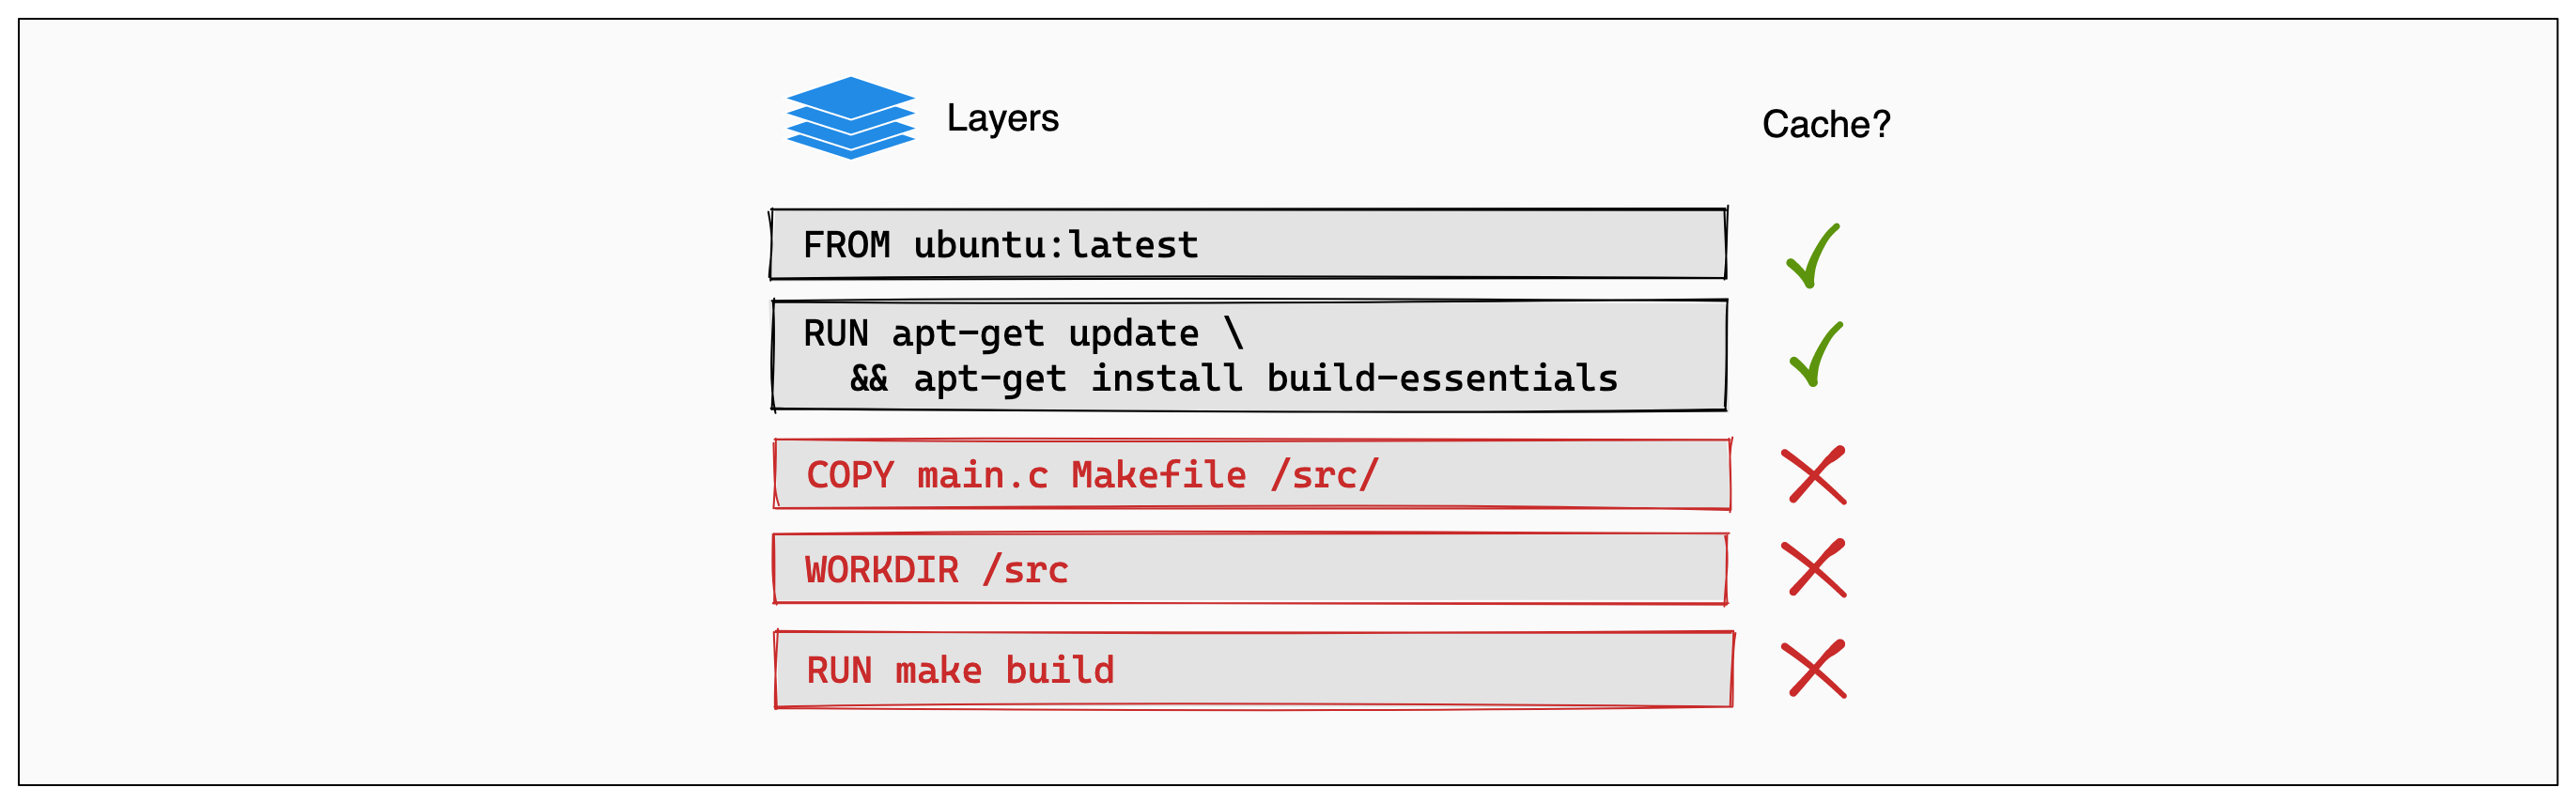
Using the build cache effectively lets you achieve faster builds by reusing results from previous builds and skipping unnecessary work.
- Any changes to the command of a RUN instruction invalidates that layer.
- Any changes to files copied into the image with the COPY or ADD instructions.
- Once one layer is invalidated, all following layers are also invalidated. 2
# syntax=docker/dockerfile:1
FROM ubuntu:latest

RUN apt-get update && apt-get install -y build-essentials
COPY main.c Makefile /src/
WORKDIR /src/
RUN make build
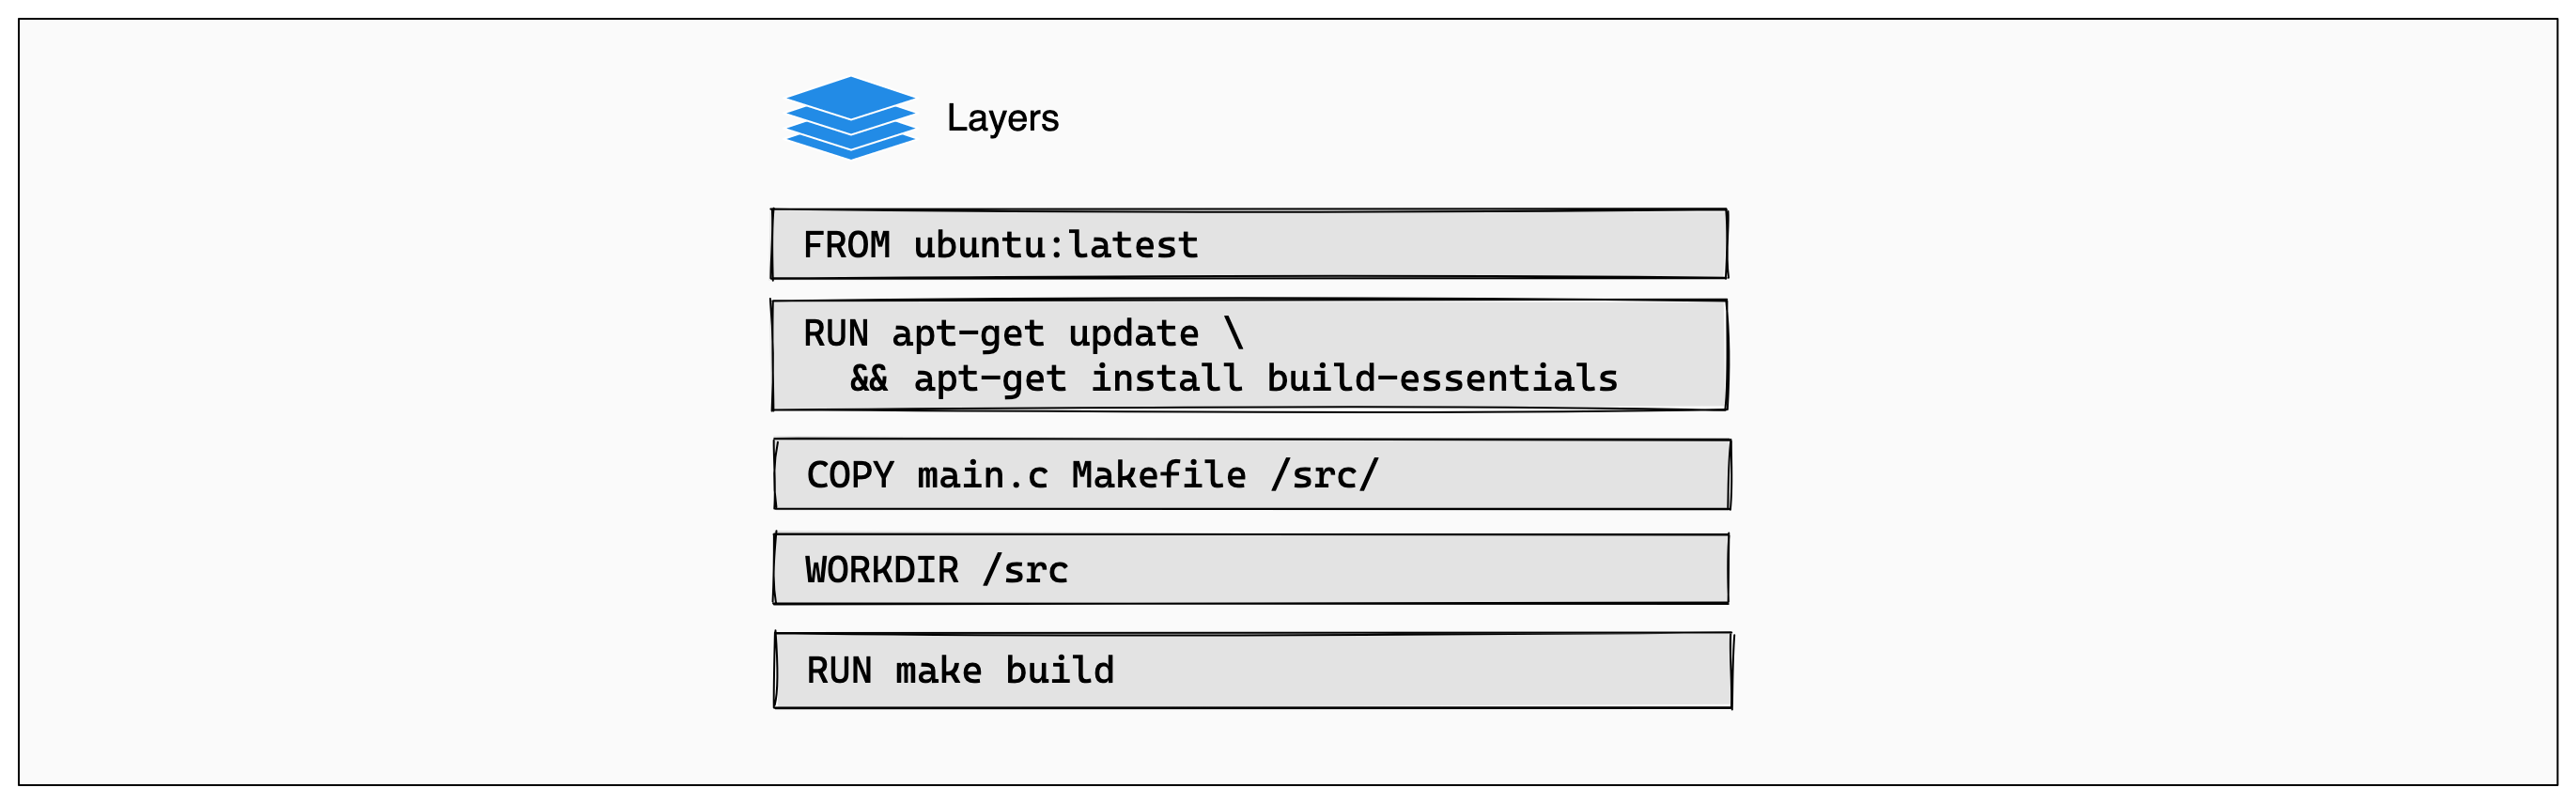
Each instruction in this Dockerfile translates to a layer in your final image.
If a layer changes, all other layers that come after it are also affected.
Best practice ?
we hope the layer frequently modified to be last one,which aims to prevent to take much time on rebuilding the other layers such as installing dependency.
Intermediate layers and template
Multi-stage Builds
For compiled languages,like C or Go or Rust, multi-stage builds let you compile in one stage and copy the compiled binaries into a final runtime image. No need to bundle the entire compiler in your final image.3
# Stage 1: Build Environment
FROM builder-image AS build-stage
# Install build tools (e.g., Maven, Gradle)
# Copy source code
# Build commands (e.g., compile, package)

# Stage 2: Runtime environment
FROM runtime-image AS final-stage
#  Copy application artifacts from the build stage (e.g., JAR file)
COPY --from=build-stage /path/in/build/stage /path/to/place/in/final/stage
# Define runtime configuration (e.g., CMD, ENTRYPOINT)
Docker Push
If this is the first time you are pushing an image, the client will ask you to login. Provide the same credentials that you used for logging into Docker Hub.
It is important to have the format of yourusername/image_name so that the client knows where to publish.
Now that your image is online, anyone who has docker installed can play with your app by typing just a single command.
Docker Container
Run
docker run is aliases of docker container run [OPTIONS] IMAGE [COMMAND] [ARG…],which defines how to create and run a new container from image.
Important
While docker run is a convenient tool for launching container,it becomes difficult to manage a growing application stack with it. That's where Docker Compose comes to rescue.
Network
Bridge
When docker is installed, it creates three networks automatically.
docker network ls
NETWORK ID     NAME      DRIVER    SCOPE
1f50a9c659fd   bridge    bridge    local
af3e60c1b1c0   host      host      local
534df30aa391   none      null      local
host and none network
The latter two are not fully-fledged networks, but are used to start a container connected directly to the Docker daemon host's networking stack, or to start a container with no network devices. This tutorial will connect two containers to the bridge network.4
if you have not specified any --network flags, the containers connect to the default bridge network, which can not resolve a container name to an IP address,but it works for user-defined networks,5and containers will connect to the same user-defined networks bridge which created by docker compose.
Note
Automatic service discovery can only resolve custom container names, not default automatically generated container names5
docker run --name <custom_container_name> == the service name of compose.yml 6
docker container is designed as network isolation, publishing a port provides the ability to connect or communicate other containers or be accessed by host machine.
Host
If you use the host network mode for a container, that container's network stack isn't isolated from the Docker host (the container shares the host's networking namespace), and the container doesn't get its own IP-address allocated.7
Volume
Volumes are a storage mechanism that provide the ability to persist data beyond the lifecycle of an individual container.8so it can be shared by other or old containers.
NVIDIA GPU Support
To use NVIDIA GPUs within Docker containers (especially with Docker Compose), you must install the NVIDIA Container Toolkit.
Installation (Ubuntu)
curl -fsSL https://nvidia.github.io/libnvidia-container/gpgkey | sudo gpg --dearmor -o /usr/share/keyrings/nvidia-container-toolkit-keyring.gpg \
  && curl -s -L https://nvidia.github.io/libnvidia-container/stable/deb/nvidia-container-toolkit.list | \
    sed 's#deb https://#deb [signed-by=/usr/share/keyrings/nvidia-container-toolkit-keyring.gpg] https://#g' | \
    sudo tee /etc/apt/sources.list.d/nvidia-container-toolkit.list

sudo apt-get update
sudo apt-get install -y nvidia-container-toolkit

# Configure Docker runtime
export NVIDIA_CONTAINER_TOOLKIT_VERSION=1.18.2-1
sudo apt-get install -y \
      nvidia-container-toolkit=${NVIDIA_CONTAINER_TOOLKIT_VERSION} \
      nvidia-container-toolkit-base=${NVIDIA_CONTAINER_TOOLKIT_VERSION} \
      libnvidia-container-tools=${NVIDIA_CONTAINER_TOOLKIT_VERSION} \
      libnvidia-container1=${NVIDIA_CONTAINER_TOOLKIT_VERSION}
Prerequisites
- You installed a supported container engine (Docker, Containerd, CRI-O, Podman).
- You installed the NVIDIA Container Toolkit.
Configuring Docker
- Configure the container runtime by using the
nvidia-ctkcommand:
The nvidia-ctk command modifies the /etc/docker/daemon.json file on the host. The file is updated so that Docker can use the NVIDIA Container Runtime.
2. Restart the Docker daemon:
Sharing files between a host and container
Docker Compose
 9
Docker Compose defines your entire multi-container application in a single
9
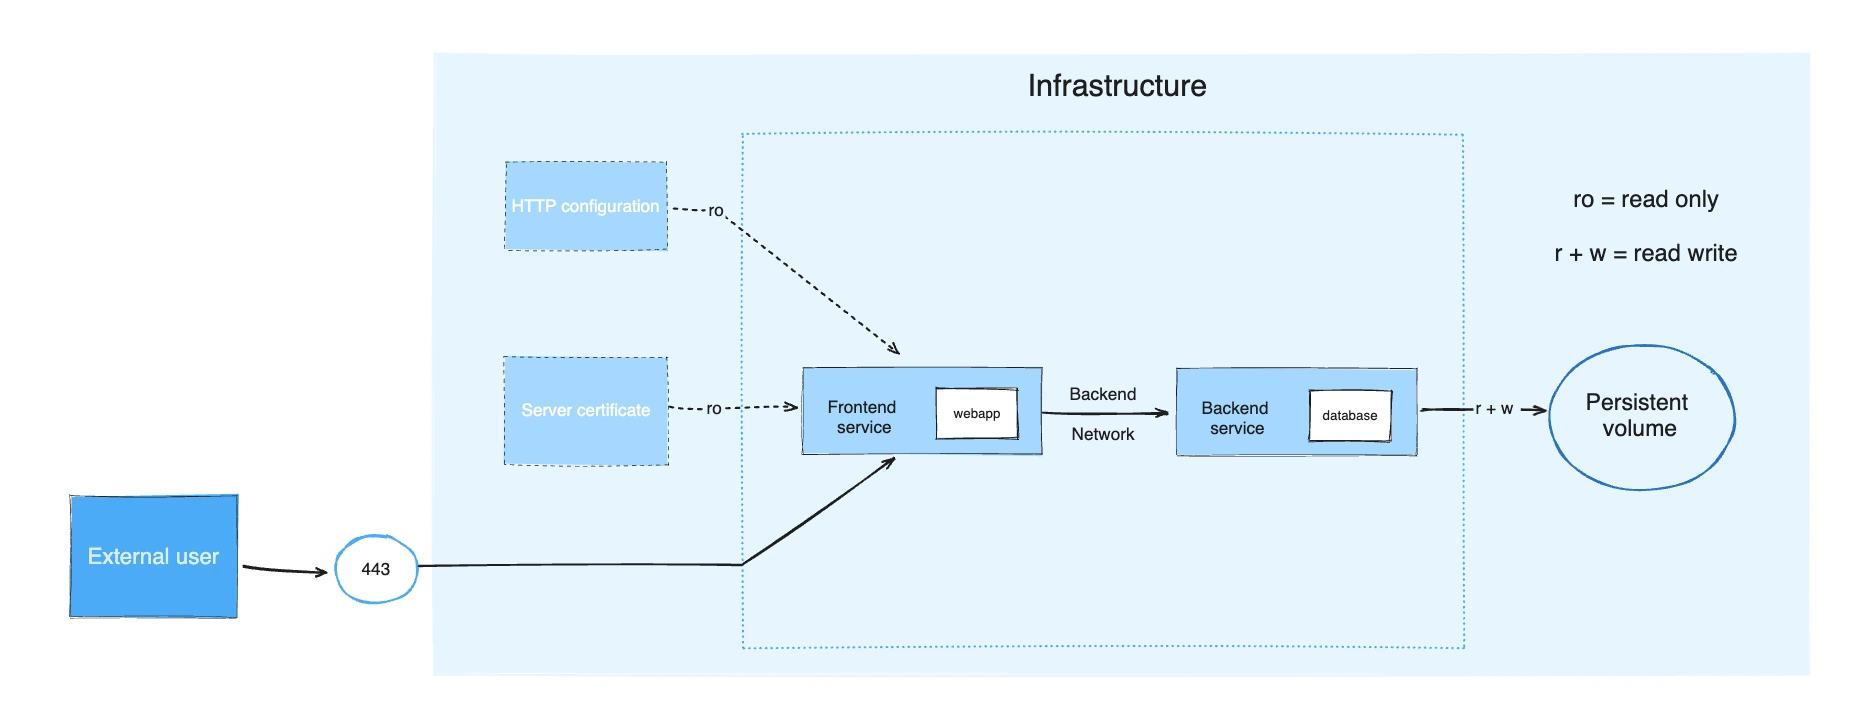
Docker Compose defines your entire multi-container application in a single YAML file called commpose.yml. The file specifies configuration for all your containers,their dependencies, environment variables, and even volumes and networks.10
Configuration
There are 3 ways for docker compose to read configs, merge, extend, include.,11 merge configs is most widely used while developing, extend and include are suitable for multiple services or teams.
Default behavior of docker compose up? Compose read 2 files, a compose.yaml and an optional compose.override.yaml file. By convention, the compose.yaml contains your base configuration. The override file can contain configuration overrides for existing services or entirely new services.12
Strategy Use a two-file approach for different environments
compose.yml: Main configuration for production- Run with:
docker compose -f compose.yml up -d compose.override.yml: Override file for development- Automatically used with:
docker compose up -d
This strategy allows you to maintain a base configuration for production while easily switching to a development setup with overrides.13
what if i don't like default behavior? To specify or merge multiple configs use docker compose -f <config_path> up.14
Note
Paths are evaluated relative to the base file. When you use multiple Compose files, you must make sure all paths in the files are relative to the base Compose file (the first Compose file specified with -f).14
how to merge? precedence?
- For single-value options like
image,commandormem_limit, the new value replaces the old value. - For the multi-value\(list\) options
ports,expose,external_links,dns,dns_search, andtmpfs, Compose concatenates both sets of values. - For key-value options
environment,labels,volumes, anddevices, Compose "merges" entries together with locally defined values taking precedence.15
compose.yaml or docker-compose.yaml?
The default path for a Compose file is compose.yaml (preferred) or compose.yml that is placed in the working directory. Compose also supports docker-compose.yaml and docker-compose.yml for backwards compatibility of earlier versions. If both files exist, Compose prefers the canonical compose.yaml.16
Dockerfile versus Compose file
A Dockerfile provides instructions to build a container image while a Compose file defines your running containers. Quite often, a Compose file references a Dockerfile to build an image to use for a particular service.17
Project name
Docker Commands
Use Docker by User without sudo
Post-installation steps | Docker Docs
Auto Start
Check the Running Container
# ps= process status,show running containers
docker ps
# show containers that are running or exited
docker ps -a
Usage and rate limits | Docker Docs
Remove Containers
deletes all containers that have a status of `exited
Clean up
Remove Image
Linter
-
https://docs.docker.com/get-started/docker-concepts/building-images/understanding-image-layers/#stacking-the-layers ↩
-
https://docs.docker.com/get-started/docker-concepts/building-images/using-the-build-cache/ ↩
-
https://docs.docker.com/get-started/docker-concepts/building-images/multi-stage-builds/#explanation) ↩
-
https://docs.docker.com/engine/network/tutorials/standalone/#use-the-default-bridge-network ↩
-
https://docs.docker.com/engine/network/tutorials/standalone/#use-user-defined-bridge-networks ↩↩
-
https://docs.docker.com/compose/how-tos/networking/ ↩
-
https://docs.docker.com/engine/network/drivers/host/ ↩
-
https://docs.docker.com/get-started/docker-concepts/running-containers/persisting-container-data/ ↩
-
https://docs.docker.com/compose/images/compose-application.webp ↩
-
https://docs.docker.com/get-started/docker-concepts/running-containers/multi-container-applications/#explanation ↩
-
https://docs.docker.com/compose/how-tos/multiple-compose-files/ ↩
-
https://docs.docker.com/compose/how-tos/multiple-compose-files/merge/ ↩
-
https://github.com/fastapi/full-stack-fastapi-template ↩
-
https://docs.docker.com/compose/how-tos/multiple-compose-files/merge/#how-to-merge-multiple-compose-files ↩↩
-
https://docs.docker.com/compose/how-tos/multiple-compose-files/merge/#merging-rules ↩
-
https://docs.docker.com/compose/intro/compose-application-model/#the-compose-file ↩
-
https://docs.docker.com/get-started/docker-concepts/the-basics/what-is-docker-compose ↩